

Drawing a Realistic Portrait of a Happy Couple
- Mike G
- Jun 23, 2023
- 4 min read

Updated: Nov 29, 2023

Hello everyone, welcome to my blog where I share my art journey and document what I do. In this post, I will show you one of my recent drawings: a portrait of a bride and groom.
This drawing was inspired by a photo I found online of a happy couple on their wedding day. I wanted to capture their happiness and love in my drawing, as well as practice my skills in realism and contrast.
Here is how I created this drawing and what I learned from it.
Starting the Portrait of a Happy Couple by Sketching the Outline

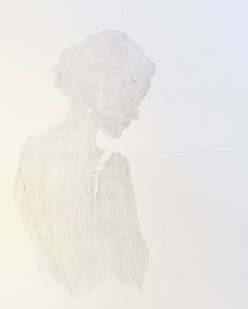
The first thing I did was sketch the outline of the bride using a light pencil (HB). I used the reference photo as a guide and tried to get the basic shapes and proportions right. I also marked the nose line and the eye line for her face to help me place the features correctly.
This step was not too difficult, but it took me some time to adjust the angles and distances between the facial features. I also had to be careful not to press too hard on the paper, as I would erase some of the lines later.
Applying the Reilly Method for the Bride
The next thing I did was apply the Reilly method for the bride’s face. The Reilly
method is a technique that helps to create realistic and expressive faces by using rhythmic lines and curves. It is based on the idea that the face is composed of three main masses: the cranium, the facial wedge, and the jaw. These masses are connected by curved lines that define the planes of the face.
I learned this method from watching YouTube videos, which I highly recommend if you want to improve your portrait drawing skills. To use this method, I started by drawing the main masses of the bride’s face with simple shapes. Then I added some curved lines to indicate the direction of the light and shadow. I also drew some guidelines for the eyes, nose, mouth, and ears.
This step was very helpful for me, as it helped me to understand the structure and anatomy of the face better. It also made it easier for me to add value and details later.
Adding Value to the Bride


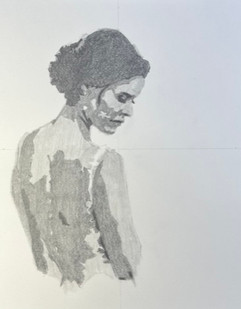


The next step was to add some value to the bride. Value is the degree of lightness or darkness of a color. It helps to create depth, volume, and contrast in a drawing.
I used five shades of value for this drawing: white, light gray, medium gray, dark gray, and black. I used a range of pencils from HB to 4B to achieve these shades.
I started by applying a light gray tone to the whole silhouette, except for the areas that are white (such as the wedding dress). Then I added medium gray to the areas that are in shadow (such as the eye sockets, nostrils, lips, neck, etc.). Next, I added dark gray to the areas that are in deep shadow (such as under the chin, the hair, under the nose, etc.). Finally, I added black to the darkest parts (such as eyelashes, eyebrows, hairline, etc.).
I also used a blending stump to smooth out each value and create a softer effect.
This step was challenging for me, as it required me to observe carefully how light and shadow affect different parts of the face. It also required me to control my pressure and strokes well. However, it was also very rewarding, as it made my drawing look more realistic and three-dimensional.
Finishing the Bride

The last step for the bride was to finish her face and hair by smoothing out some more transitions between values and adding some details.
I used a kneaded eraser to lift off some of the graphite and create highlights on her skin and hair. I also used a sharp pencil (2B) to add some fine lines and textures to her eyes, lips, nose, ears, and hair.
I also added some details to her dress such as lace patterns.
This step was fun for me, as it allowed me to refine some of the shapes and edges that were not clear before.
Repeating All Steps for the Groom


The final step was to repeat all the steps for the groom. I followed the same process as for the bride, but with some differences:
I used a slightly darker tone for his skin and hair.
I used more angular lines and shapes for his face and features.
I drew his suit and tie with straight lines and sharp edges.
I’m very happy with how this drawing turned out. I think I managed to capture their likeness and emotion well. I also learned a lot from this drawing, such as how to use the Reilly method, how to create realistic values, and how to add details and textures.
I hope you enjoyed this post and found it interesting. If you have any questions or feedback, feel free to leave a comment below.
Also, I want to express my sincere gratitude to each and every one of you for taking the time to explore my blog post. Your engagement and support means the world to me. If you've been captivated by the featured drawing or any other pieces showcased on my website, they are available for purchase. Additionally, I welcome the opportunity to create a custom piece just for you. If you have a specific vision or if there's someone special you'd like me to draw, feel free to reach out. You can contact me via email at artbymikelsean@gmail.com. Your interest and enthusiasm fuels my passion for art, and I look forward to the possibility of turning your creative ideas into beautiful, personalized works. Thank you once again for being a part of my artistic journey.
Warm regards,
Mikel Sean


Comments